Dry Materials 1: Graphite and Charcoal
- Caroline Harding

- Nov 16, 2023
- 11 min read
Graphite

Adjectives
Controlled, detailed, slightly rough, reliable, slow, shiny, hard, durable
Supporting materials:
Erasers (kneaded and plastic or vinyl)
Handheld or electric sharpener for pencils (an alternative can be an x-acto knife, but it is more dangerous for students to use)
Sandpaper to sharpen graphite core
blending stumps and tortillions
Paper towels
An electric eraser or pencil eraser can be used to get fine details
Water cup and brush for water-soluble graphite
Paper
Different brands and types:
Caran d'Ache Grafcube Graphite Sticks https://www.dickblick.com/products/caran-dache-grafcube-graphite-sticks/
General's Pure Woodless Graphite https://www.dickblick.com/products/generals-pure-woodless-graphite/
Blick Studio Drawing Pencils and Sets https://www.dickblick.com/products/blick-studio-drawing-pencils/
Faber-Castell 9000 Pencils and Sets https://www.dickblick.com/products/faber-castell-9000-pencils/
Derwent Graphitone Water Soluble Pencils and Sets https://www.dickblick.com/products/derwent-graphitone-water-soluble-pencils/
Prismacolor Ebony Pencil Sets https://www.dickblick.com/products/prismacolor-ebony-pencil-sets/
Lyra Graphite Crayons and Sets https://www.dickblick.com/products/lyra-graphite-crayons/
General's Graphite Block https://www.dickblick.com/products/generals-graphite-block/
Experimentation


Top row: 2H, H, HB. Bottom row: 2B, 4B, 6B
Notes:
This material felt really hardy when used, I didn't feel like it would suddenly break off and crumble to dust if I used too much pressure or griped it too tight. I was also able to find a lot of control when using the material as well, and I think that this material is well suited for small detail work. It was very easy to utilize stippling and hatching with this medium because of this fact. However, it is important to note that it takes a while to get even coverage for large areas of space. Using a graphite stick can help shorten the time it takes to do this. One of the things to note is that this material is able to be smudged when working. It is not as fragile or smudgeable as other mediums such as vine charcoal, but using a scrap piece of paper or towel as a handrest can help prevent accidentally messing up a drawing. I would also recommend using graphite on white paper because the metallic shine of the pencil doesn't fit as harmoniously with other colored or toned paper. However, I did find it interesting how the graphite was essentially inverted on black paper because the metallic shine of it made it appear lighter than the black.
Lastly, graphite comes in many different forms, including blocks/sticks, woodless pencils, powder, or water-soluble graphite. Having a set of blocks/sticks can be extremely helpful for students who have fine motor control challenges or for those who want to cover a lot of space quickly. Woodless pencils are also a great resource for students to use who have trouble sharpening pencils, and it maximizes the surface space available to create marks. I would not recommend using powdered graphite with students because it can be extremely messy, and it can be dangerous for students to use because of the risks it possesses if a student inhales it. However, water-soluble graphite can be a fun alternative for students to play with who are already familiar with graphite or want to cover large areas of space quickly with little to no wrist pain. The only thing to note with water-soluble graphite is that it is very difficult to erase.
Other Examples :

This is a drawing I did this semester of a Vinca Minor Periwinkle vine for my botanical illustration class. This is a good example of how graphite can be used to realistically capture something and how you can get very dark values by using the B pencils. For this drawing, I used all my graphite pencils ranging from 2H to 6B.
Safety/health considerations
Graphite pencils are made from graphite and are generally considered safe. They can be rather pointy though, so children must be supervised and instructed to only use the tools for their intended purpose. If a pencil accidentally punctures the skin, the best course of action is to send the student to the nurse to have the wound cleaned and checked out. Additionally, it is best practice to have children wash their hands after using the material to remove any residue from their skin to prevent any harm. Lastly, it is important that any graphite dust or eraser shaving is not inhaled because doing so can damage the lungs overall health.
Data Safety sheet for Faber Castel graphite pencils: https://s3-ap-southeast-2.amazonaws.com/wc-prod-pim/Asset_Documents/Faber-Castell%20Graphite%20Pencils%20SDS.pdf
Project ideas:
Still Life

This is an 18" x 24" still-life drawing that I did for one of my drawing classes.
I think that graphite is a good medium to use for introducing students to still lives. Still-lives can be helpful for students' artistic growth by challenging them to exercise their ability to transfer what they see through their hands onto paper. You can also challenge students to set up their own still life with any objects they want to allow them to focus on their own interests. I think that graphite is a good medium for this because it is already a familiar tool to many students, so beginners would feel like they have at least some understanding of how to use the material. Additionally, by removing color from the equation, students are able to focus on value instead of getting lost in different hues. Furthermore, this medium allows students to have a lot of control over their lines and value, unlike other softer mediums.
Subtractive Drawing

This is an image I found online that is a good example of a subtractive erasure drawing.
One project or activity that can be done with students is to challenge them to use their erasers as drawing tools. Students would be tasked with covering a white sheet of paper with graphite using a graphite stick to get maximum coverage fast. Then, students would be given an eraser and told to draw an image only using the eraser. This would engage students with focusing on reverse drawing and using an eraser as more than just a tool to erase mistakes. To complete this project or activity, they would have to draw the light instead of the shadow.
Accommodation possibilities:
Softcore graphite pencils for students with a weaker grip strength
Pencil grips for students working on their grip strength and fine motor skills
Sticks instead of pencils to help give students a bigger space to hold the material
Different-sized materials can give students the ability to pick what works best for them
Appropriate age group and behavioral expectations
Graphite is an accessible and appropriate medium for students of all ages to engage with. Younger students would do best with graphite pencils, with limited choices in range in hardness to help them focus on developing their fine motor skills and understanding of the medium in general without confusing them. Additionally, extremely young students might need assistance with sharpening their pencils. An electric sharpener might help these students in this instance. Older students should be expected to be able to utilize the full range of graphite pencils in their practice and would enjoy exploring other varieties of the medium, such as water-soluble graphite.
Artist resources
Adonna Khare
Adonna Khare is a contemporary America Artist who mainly focused on carbon pencil on paper drawings. The winner of the 2012 ArtPrize Competition, Khare creates large-scale works that combine realistic depictions of animals with fabulist, image-based storytelling. She works to realize what is relevant to our world, but in doing so, she asks us to see her messages from different perspectives.

“Zebra and Eggs” by Adonna Khare, 2022. Carbon Pencil. 11 in x 17 in.

"Pear Snails," by Adonna Khare, 2013. Carbon Pencil, 11 in x 14 in.
Arinze Stanley Egbengwu
Arinze Stanley Egbengwu (born 1993) is a Nigerian artist, activist, photographer, engineer, and entrepreneur. He is best known for creating hyperrealistic pencil drawings. Working primarily with charcoal and graphite on paper, Egbengwu uses his works as a medium for social and political activism. His work addresses matters including racism, modern slavery, and feminism both in his community and worldwide.

“Black Noise,” by Arinze Stanley, 2017. Graphite on Paper, 35 x 42 in.

“Negro Monalisa,” by Arinze Stanley, 2018. Charcoal and Graphite on paper, 35 x 29 in.
Charcoal

Adjectives
Powdery, rough, fast, loose, gestural, messy, crumbly, fragile, fleeting, dark, temporary
Supporting materials:
Erasers (kneaded and plastic or vinyl)
Handheld or electric sharpener for pencils (an alternative can be an x-acto knife, but it is more dangerous for students)
Sandpaper to sharpen charcoal core
blending stumps and tortillions
Paper towels
An electric eraser or pencil eraser can be used to get fine details
A chamois
Fixative sprays
Paper (toned or white)
Gloves
Soft bristle brushes
Different brands and types:
General's Compressed Charcoal https://www.dickblick.com/products/generals-compressed-charcoal/
Alphacolor Quartet Char-Kole Squares https://www.dickblick.com/products/alphacolor-quartet-char-kole-squares/
Faber-Castell Pitt Compressed Charcoal Sticks https://www.dickblick.com/products/faber-castell-pitt-compressed-charcoal-sticks/
General's Charcoal Pencils and Sets https://www.dickblick.com/products/generals-charcoal-pencils/
Derwent Charcoal Pencils and Sets https://www.dickblick.com/products/derwent-charcoal-pencils/
Winsor & Newton Vine Charcoal Packs https://www.dickblick.com/products/winsor-newton-vine-charcoal-packs/
Blick Studio Vine Charcoal https://www.dickblick.com/products/blick-studio-charcoal/
Coates Premium Artist's Willow Charcoal https://www.dickblick.com/products/coates-premium-artists-willow-charcoal/
Blick Studio Willow Charcoal https://www.dickblick.com/products/blick-studio-willow-charcoal/
Experimentation


Top row: 2H compressed charcoal pencil, 6B compressed charcoal pencil, vine charcoal stick. Bottom row: willow charcoal stick, 2B compressed charcoal stick, 6B compressed charcoal stick.
Notes:
This medium, while similar to graphite, is very distinctive in its own ways. It is a lot looser, rougher, and messier than charcoal, for starters. It also works great on other colored and toned papers. One of the aspects of charcoal that I like to explore when using it is how texture can be created by letting the rough lines stand on their own without excessive blending with a blending stump or tortillon to create a smooth appearance. Charcoal is a good medium to use to get out quick gestural sketches. It is fairly easy to quickly cover a lot of ground using charcoal, especially when using charcoal sticks. However, there are different levels of core harness with charcoal pencils that allow for more control over the medium, the ability to do small, detailed work, and less of a mess made on someone's hand. Beyond charcoal sticks and pencils, there is also charcoal powder. However, this can be extremely messy and dangerous to students' raspatory health if inhaled, so it is not recommended to have this material in class.
There are different types of charcoal, including compressed, white, vine, and willow. Compress charcoal can get a darker tone than the other types and is more permanent and resistant to being erased. White charcoal is similar to compressed charcoal just, which is a white core instead of a black one. Meanwhile, vine and willow charcoal are much softer and can easily be erased or even wiped away. This makes those types of charcoal great for first sketches and layers because it allows students to make corrections easily. Overall, there is less control over the medium than graphite which allows for some spontaneity.

Warning this material can be very messy!
Other examples:

This is a charcoal drawing that I completed recently as part of a project in one of my drawing classes. This self-portrait was created using mostly willow charcoal on grey-toned paper with some additional compressed charcoal in areas to achieve a darker value.
Safety/health considerations

Charcoal is a non-toxic material that is safe for students of all ages to use. However, one area that needs to be monitored when utilizing this media is the excess build-up of charcoal dust. Charcoal is commonly considered a nuisance dust, but inhalation of large amounts of it can create chronic lung problems through mechanical irritation and clogging. Blowing excess dust off of a drawing is one major source of charcoal inhalation and should be avoided. The room should also be cleaned up regularly to prevent charcoal dust build-up when working with the medium. Additionally, it is best practice to have children wash their hands after using the material to remove any residue from their skin to prevent any harm.
Fixative spray is an additional material that can be used with the medium to help prevent smudging. However, both permanent and workable spray fixatives contain toxic solvents and are sometimes composed of plastic particulates. To prevent exposure to these solvents' smudging particulates by inhalation, have the sprayer use the spray outside to prevent toxic fume inhalation and build-up.
Data Safety sheet for General's charcoal pencils: https://www.dick-blick.com/msds/DBH_SDS_22921XXXX.pdf
Project ideas:
Symmetrical body drawing

This is a teacher example I created of this project that was done on 16 x 18 paper.
Based on Heather Hansen, this project asks artists to create a drawing using two pieces of charcoal, one in each hand. This tasks students with using their nondominant hand and moving their whole body instead of just their wrist to create this work. Ideally, students will be given a large paper, but if space is limited, then smaller papers can be utilized to achieve a similar effect. This project can be modified for students who can't use both hands by removing the symmetrical component and tapping the paper to the wall to promote full shoulder and body movement of one hand.
Gestural figure drawing


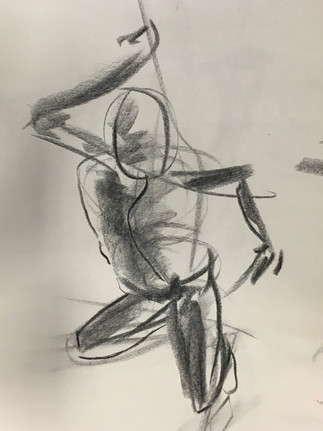
These are three different figure drawing studies (5 and two 1-minute drawings) that I made that show different strategies and techniques that can be used to capture a figure.
Charcoal is an excellent medium that can be used to capture figures quickly. There are different types of gestural figure drawing styles and techniques that can be explored with students while helping them build strategies to translate what they see in person to paper. Additionally, this exercise will strengthen their visual perception skills and understanding of human anatomy. Vine charcoal or compressed charcoal sticks is recommended for this activity to help students make corrections and changes and use their shoulder when drawing.
Accommodation possibilities:
Gloves for students with sensory issues
Softcore charcoal pencils for students with a weaker grip strength
Pencil grips for students working on their grip strength and fine motor skills
Sticks instead of pencils to help give students a bigger space to hold the material
Different sized materials to give students the ability to pick what works best for them
Soft bristle brushes, paper stumps and tortillions so that students can manipulate the charcoal without touching it
Appropriate age group and behavioral expectations
While charcoal is safe to use for students of all ages, I would hold off on introducing the medium to students until they are in 5th grade. This is because the medium is rather messy and can be dangerous if children inhale charcoal dust. Older elementary students should be developmentally ready to engage with this medium safely and follow directions. However, charcoal pencils may be safer for these students to interact with because it produces less dust and is less messy overall.
Artist resources
William Kentridge
William Kentridge is a South African artist best known for his prints, drawings, and animated films, especially noted for a sequence of hand-drawn animated films he produced during the 1990s. The latter are constructed by filming a drawing, making erasures and changes, and filming it again. He continues this process meticulously, giving each change to the drawing a quarter of a second to two seconds' screen time. A single drawing will be altered and filmed this way until the end of a scene. These palimpsest-like drawings are later displayed along with the films as finished pieces of art.

“The Conservationists’ Ball,” by William Kentridge, 1985. Charcoal, colored pastel and gouache on paper (triptych). 78.1 x 38.4 in (left), 78.1 x 54.5 in (center), 78.1 x 38.4 in (right).
Six different charcoal animations by William Kentridge
Heather Hansen
Heather Hansen is a performative and visual artist known for her kinetic drawing series. She has performed and exhibited in major cities throughout Asia, Europe and the U.S. Her work been featured repeatedly by Juxtapoz, Collosal, Fubiz, and Hi-Fructose among others. Originally from rural Idaho, Hansen graduated from TESC in dance and theater design. She then moved to Tokyo to study with dancer Kazuo Ohno, where her aesthetic and philosophy was greatly influenced by the butoh and Gutai art movements; especially in relation to minimalism, the body as a tool, and process holding the same value as product. Later her style was further defined in Florence, and Paris where she studied classical fresco painting and contemporary dance.

Ochi project series

In progress creation picture of one of the works from the Ochi project series
Video of Heather Hansen creating her work
Project: Rainbow Crow Part 1
For this first project that I am creating exploring the idea of symbolism and meaning associated with birds in different cultures, I chose to focus on the crow in relationship to Native American culture. This legend, in particular, is something that is important to me because I grew up listing to my dad tell me this story. The story of the Rainbow Crow is a supposed Lenape legend, symbolizing the value of selflessness and service. However, upon conducting further research, the story may have originated as a Cherokee story known as the "First Fire" and been modified through cultural intermingling. This story explains how the first fire came to be as well as why crows look the way they do. The drawing of a crow I created in charcoal is meant to represent how the crow looks at the end of the story. However, there is another part of this project I completed in chalk pastel that shows how the crow looked before that is discussed and explored in my dry materials part 2 blog post.

For the first layer, I blocked out values and put down charcoal that can then be lightened or darkened.

Then I smudge the charcoal to get a consistent value that I can then darken by adding more charcoal or lighten by erasing to create depth.
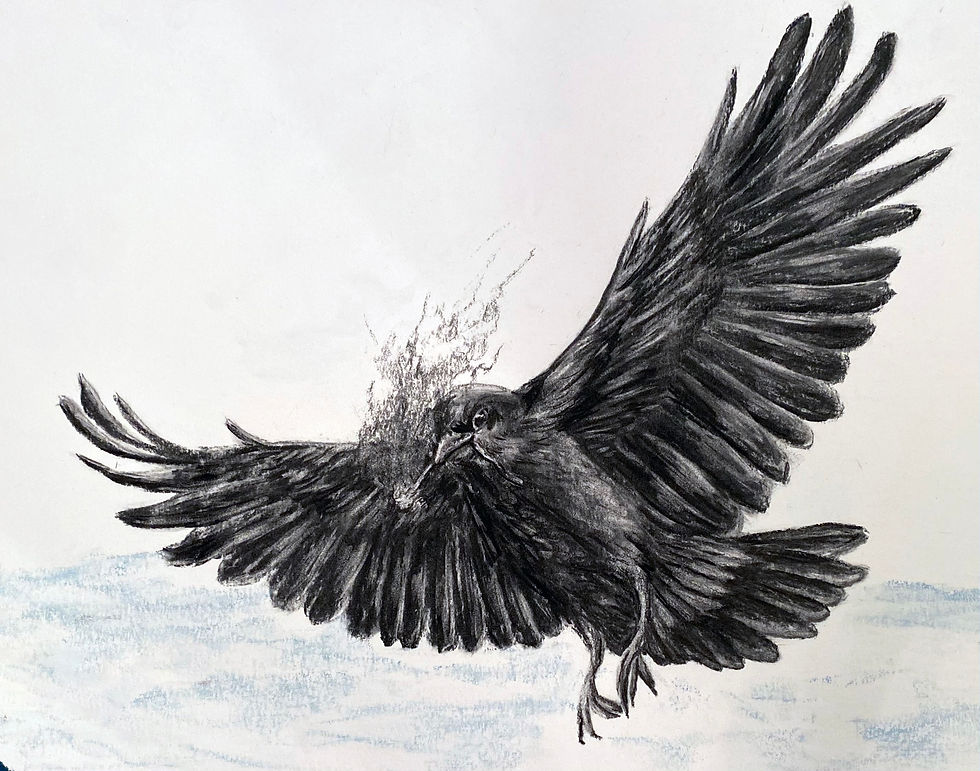
This is the final image of the charcoal portion of this project. I used a needed eraser to help erase the feathers on the bird. There is a light blue pastel used behind the bird to create a snowy ground. To learn more about the second half of this project, go to my blog post on dry materials part 2.


Comments