Printmaking
- Caroline Harding

- Nov 16, 2023
- 8 min read

Adjectives
Copies, repetitive, unique, one-of-a-kind, mechanical, process, different, similar, fast
Different brands and types:
Akua Liquid Pigment https://www.dickblick.com/products/akua-liquid-pigment/
Cranfield Caligo Safe Wash Relief Inks and Set https://www.dickblick.com/products/cranfield-caligo-safe-wash-relief-ink/
Speedball Water-Soluble Block Printing Inks and Set https://www.dickblick.com/products/speedball-water-soluble-block-printing-inks/?fromSearch=%2Fsearch%2F%3Fsearchword%3Dprint%20making
Soft-Kut Printing Blocks and Set https://www.dickblick.com/products/soft-kut-printing-blocks/?fromSearch=%2Fsearch%2F%3Fsearchword%3Dprint%20making
Blick Readycut Printing Blocks https://www.dickblick.com/products/blick-readycut/?fromSearch=%2Fsearch%2F%3Fsearchword%3Dprint%20making
Flexcut Lino & Relief Printmaking Set https://www.dickblick.com/products/flexcut-lino-relief-printmaking-set/
Speedball Water-Based Block Printing Starter Set https://www.dickblick.com/products/speedball-water-based-block-printing-starter-set/
Gelli Arts Gel Printing Plates: https://www.dickblick.com/products/gelli-arts-gel-printing-plates/?fromSearch=%2Fsearch%2F%3Fsearchword%3DGelli%20plate
Speedball Soft Rubber Brayers https://www.dickblick.com/products/speedball-soft-rubber-brayers/
Artist resources
Melanie Yazzie
As a printmaker, painter, and sculptor, Melanie Yazzie’s work draws upon her rich Diné (Navajo) cultural heritage. Her work follows the Diné dictum “walk in beauty” literally, creating beauty and harmony. As an artist, she works to serve as an agent of change by encouraging others to learn about social, cultural, and political phenomena shaping the contemporary lives of Native peoples in the United States and beyond. Her work incorporates both personal experiences as well as the events and symbols from Dine culture. Her work is informed and shaped by personal experiences.

"Hiding Out," by Melanie Yazzie, 2015. Monotype, 22"x 15"

"Jason, Jim & Kiddo, " by Melanie Yazzie, 2015. Plate linocut, 16"x 22"
Rick Bartow
Rick Bartow, born in Newport, Oregon, was a Native American artist and a member of the Mad River Band of Wiyot Indians, a small tribe indigenous to Humboldt County, California. One of most nationally recognized Native American artists, Bartow created pastel, graphite, and mixed media drawings, wood sculpture, acrylic paintings, drypoint etchings, and monotypes.

“Blind Raven Conversation,” by Rick Bartow, 2008. Monotype 22" x 30"
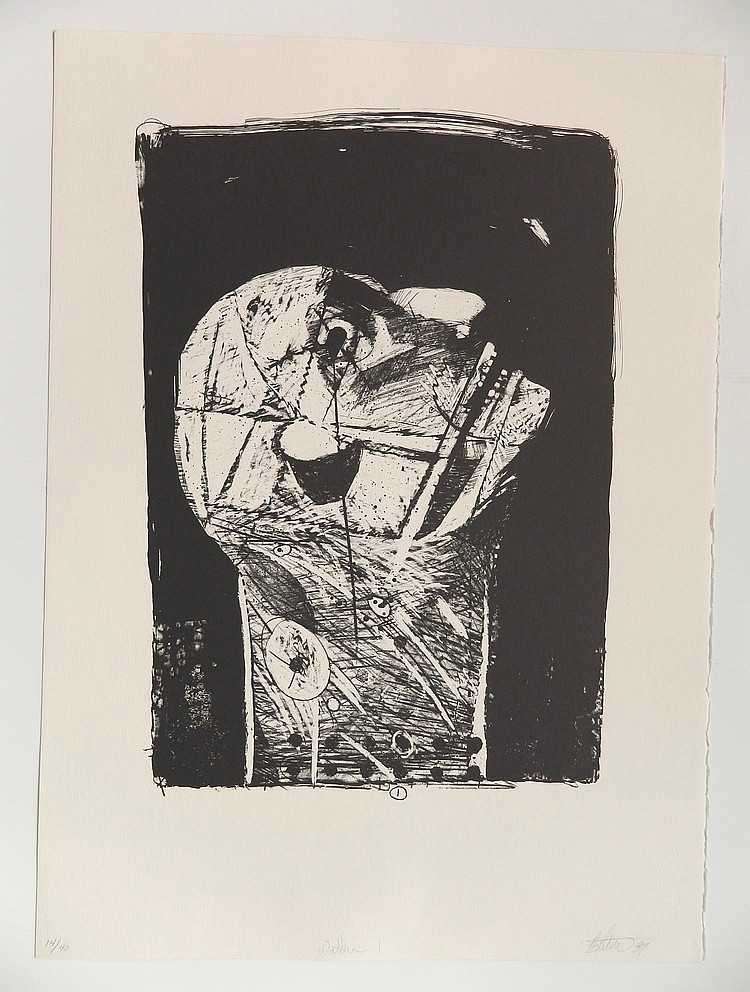
“Watcher I,” by Rick Bartow, 1989. Lithograph, 29 3/4 x 21 in.
Shaving Cream Prints

Supporting materials :
Shaving cream
Food coloring
a Mixing devise like a toothpick,
Tin foil or parchment paper
Paper
A pallet knife
Access to a sink with soap and water to wash off materials
Experimentation

hen experimenting with this shaving cream printmaking, this is what my workspace looked like all setup. To make prints, you need to put down a layer of shaving cream with food color drops placed on top and swirled in. Then, a piece of paper is put on top of the shaving cream, gently rubbed in, and then removed. After the excess shaving cream is wiped away, you will see your design underneath.

This is what my first print looked like. It was very strongly colored because most of the food coloring wasn't mixed in completely.

This is what my second print looked like. I didn't add any more food coloring; I just re-used what was left over from the first print.

These are my third and fourth prints. Because I kept reusing the same shaving cream, the colors started mixing into this uniform greenish color.
Safety/health considerations
Food coloring is safe for students to interact with and even ingest. Shaving cream is also safe for children to interact with. However, it is important to know if a student has any allergies to any of the ingredients. Furthermore, shaving cream should not be ingested, which means that little kids should be closely monitored to make sure they don’t try to eat some. Young kids will be inclined to try to eat some because it looks very similar to whipped cream.
Project ideas
Mono print with Ink linework on top

This is an image I found online that is a great example of what this project could look like.
One project idea to do with this material is to create a series of prints that all have a marble-like background and then take those prints and create line drawings on top. This project can be a fun introduction to printmaking and contour line drawing for beginner or young students.
Accommodation possibilities :
Gloves for students with sensory issues
Non-scented shaving cream for students who are allergic to fragrance or bothered by the smell
For some students, you can put the shaving cream and drops of food coloring into a bag that they can play around with to see different colors
Appropriate age group and behavioral expectations
This form of printmaking would be excellent for a younger range of students to introduce them to the concept of printmaking. However, the teacher has to be ready to make sure that no student makes a huge mess or tries to eat the shaving cream thinking it's wiped cream instead. I think that this medium can be exposed to older students as well as a fun challenge as well.
Geli Plate Prints

Supporting materials :
Ink or acrylic paint
Brayers
Gelli Plates
Printmaking or sturdy paper
Paper towels
Brushes
Palette knives
X-acto knives or scissors
Access to a sink with soap and water to wash off materials
Experimentation:

When testing the Gelli plate prints, I discovered that you can put this down on the plate to create different textures. the example above shows how the put down a paper towel (right) to get a pattern dot effect on the printed paper (left).

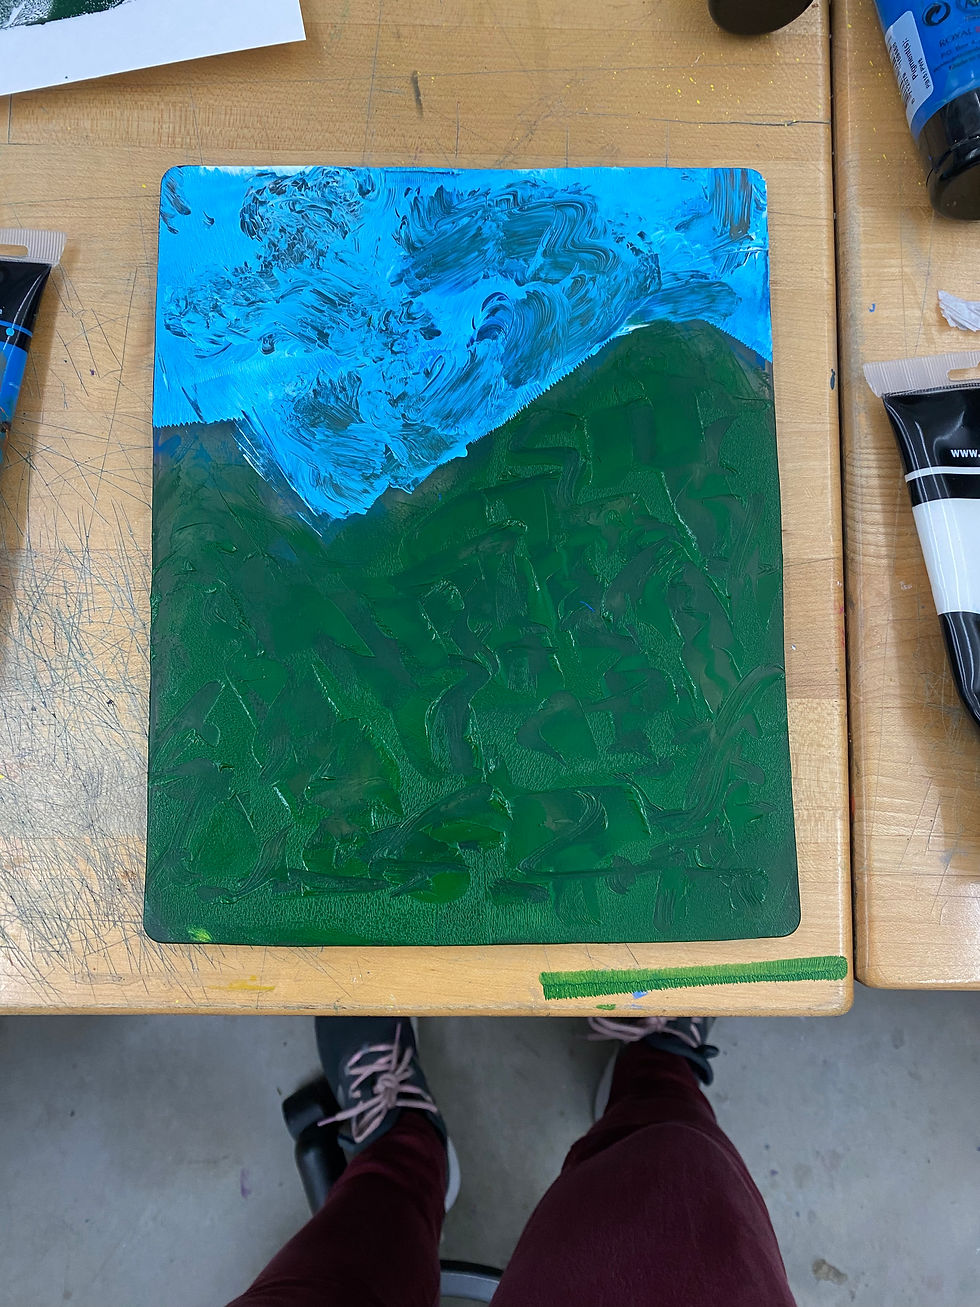
This was a two-layer print. The first layer is a pinkish, tan color. Then I created a dark green layer to go over the top. before I put the paper on, I used a piece of towel to blot out little circles on the Gelli plate, a pellet knife to scratch diagonal lines, and my finger to make a curvy path.

These were two different prints of the same idea that I created using two different techniques. I created the one on the left using gradients, flat colors, and paper cut-out stencils. I created the one on the right using mixes of color, paper towels, pallet knives, and fingers.

This is what colors I put down on the Gelli plate to make a dark green for the background hill from the print on the left.

This is what the colors looked like after I mixed them all up using the brayer.

Then, I put down my paper cut-outs to make sure that the ink was only going where I wanted it to go.

This is what it looked like after I put down the paper to get the dark green hill.

To achieve the sky, I made a gradient by putting a lighter color at the top and a darker color at the bottom, and then I rolled it out in one constant motion (side to side).

Thi sis what the gradient sky looked like on the left-most print.
For the right print, I used techniques like scrapping my pallet knife, fingers, or paper towel through the ink to create a slightly messy loose look.

This is the piece of paper that I used to roll all my excess ink from my brayer off onto to help clean it.
Safety/health considerations
Printmaking with Gelli Plates is relatively safe and risk-free. The plates are made from non-toxic synthetic gelatin, which is vegan-friendly. However, once can also learn how to make a Gelli plate online, but this plate would be made of gelatin and not be vegan friendly. When using acrylic paints as an inking material, it is important to understand the health risks associated with them. Furthermore, it is important that all materials and tools are used properly to maintain a safe environment.
Project ideas
Nature collage print

One project idea is that students have to go outside on a nature walk around the school to gather natural materials they can find in their environment (this could also be assigned as homework). Then, they take those materials and use them to create a series of Gelli plate prints that show overlapping images of these items, using them to block out shapes on the plate.
Accommodation possibilities
Smaller Gelli plate can be used with students who have fine motor control challenges
Pre-made patterns templates can also be used with students as additional supports
Appropriate age group and behavioral expectations
This form of printmaking would be accessible and appropriate for older students. I would consider introducing this material to students who are in 4th grade and upward because I believe that this age range would be able to properly handle the material and follow directions to complete this task. Additionally, they would have a more developed understanding of printmaking and its legacy in the art world.
Lino Prints

Supporting materials :
Carving tools
Ink or acrylic paint
Brayers
Printmaking or sturdy paper
Paper towels
x-acto knives or scissors
Access to a sink with soap and water to wash off materials
Linoleum plate
hair drier or heat gun
Experimentation:
For my personal project, I chose to create a print using a linoleum plate of a red-crowned crane. The red-crowned crane (Grus japonensis), also called the Manchurian crane or Japanese crane is a large East Asian crane among the rarest cranes in the world. In Japan, it is known as a symbol of luck, longevity, and fidelity. I wanted to create this bird using the printing method to mimic how the crane in portrayed in Japanese art.

To create the print, I started by drawing out my design using a thin sharpie.
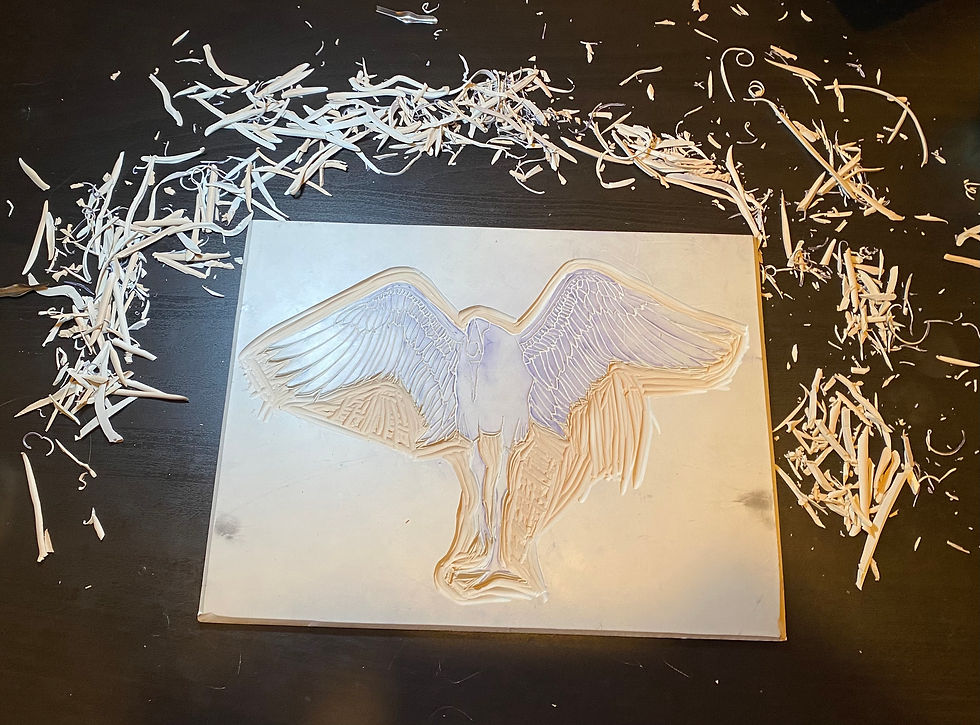
Then, I took my carving tool and carved out all the lines I drew and the space around my drawing so it would only print my design. There was a large mess of carving scraps.

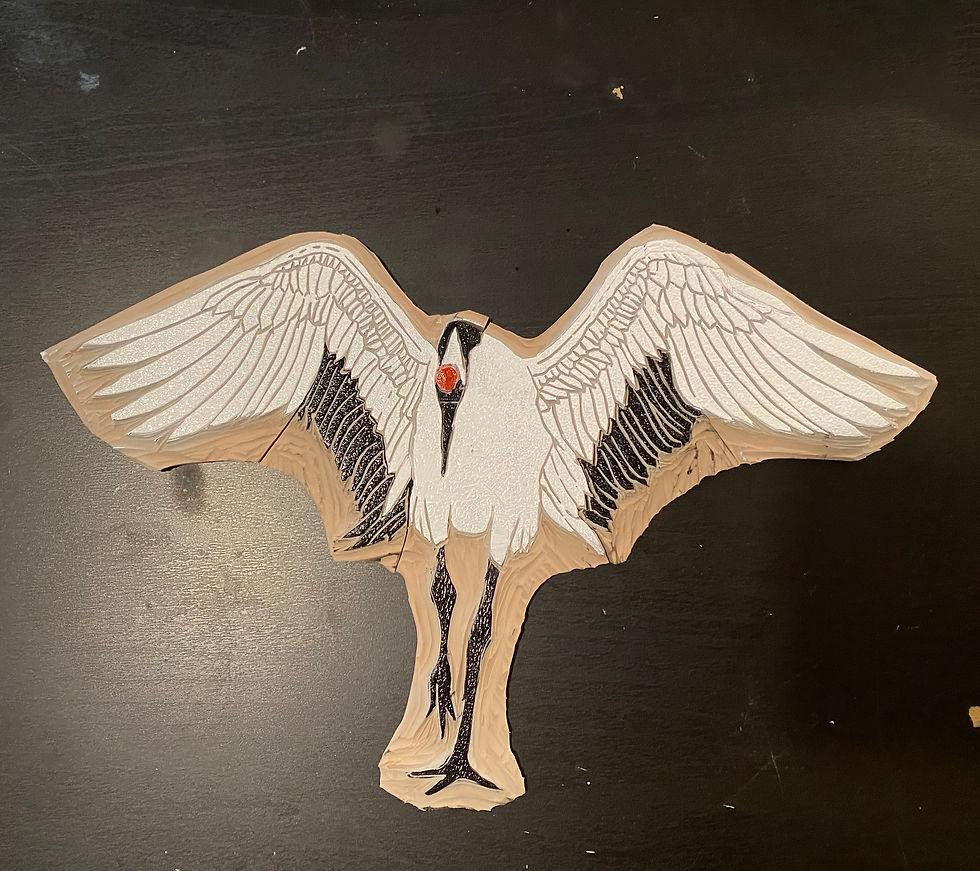
This is a picture of my design after I cut off the excess linoleum plate surrounding my design with an x-acto knife. The image is black because this picture was taken after I did my first print using black ink, which stained the surface of the plate.

These are my two tester prints using black ink to see if any changes needed to be made as well as if the print worked in general.

I wanted to have different colors so that it accurately looked like the bird I designed it after, so I cut up the different sections so I could ink them separately, then I would put them back together to create the final print.

To make a print, I put down printmaking ink on sheets taped down tinfoil and the used the brayer to think them out until there was a tacky even coat.
This is my crane after I inked all the surfaces and put them back together before printing.

Overall, I made 9 different prints of my design. Some of them were lower quality than others because I waited too long to put the paper down and the ink had dried, or I tried to make another print using the leftover ink from a previous print.

This is one of the copies that has ink missing in areas. However, this print is my mom's favorite because she likes how you can see through it in parts and tell it is a print.

This is my last print and probably has the highest quality of ink put down. It was hard to get the ink to print completely without drying out while I was inking the other areas. However, the more I practiced, the faster I got. I also learned a couple of tricks that helped me center my crane better on the paper for these final images.
Safety/health considerations
The main safety concerns associated with linoleum printmaking is the carving tools. These tools used to carve the linoleum plate are sharp, and it is very easy to cut yourself with. Students should be instructed to always cut away from the body and never put their hands in front of the carving tool when using it. Additionally, to prevent this, it is helpful to have something to hold the linoleum plat in place while you cut it or use a hand guard device. Furthermore, using a hair drier or heat gun can help soften the plate to make it easier to cut.
Project ideas
Positive and negative space
For this project, students would be tasked with creating a design that focuses on the positive and negative space in an image. They would only be limited to black ink to create their print, so they would need to consider how the positive and negative space interacts in an image to create an image. To add a challenge to this project, you could have students create inverse sections of the print, as seen above.
Accommodation possibilities :
softer linoleum block, so it is easier to carve for students with fine motor challenges
Some students could also use a hot glue gun or white glue bottle on a block to create a reverse linoleum print
A heat gun can be used to help make the linoleum plate softer and easier to carve
Some students can also use pre-made stamps to create a new combined design
Appropriate age group and behavioral expectations
This material is appropriate for advanced middle and high school students to explore. I am hesitant to allow younger students to explore this material because of the danger associated with the carving tools. Almost everyone who tested this material in my art education master’s college class cut themselves, so I don't think younger students would be spared from hurting themselves. Furthermore, there are other print-making materials that are more appropriate for younger students.


Comments